Carrot Cake

I was thoroughly psyched to see that my bookstore finally had a copy of the Joy the Baker Cookbook. Perhaps my incessant questions about when it would be in stock (due to my horrible laziness and reluctance when it comes to online shopping) paid off! Perhaps not. Either way, there were two copies, and one was automatically mine. My father, in town for a week, offered to subsidize the purchase, and we were in business! (Thanks, Dad.)

The book is beautiful. It’s full of all-new recipes that haven’t yet been on her blog. The photos are gorgeous, and just about every single recipe now has a post-it note on it, because I want to bake absolutely everything inside. When a friend of mine, Isabelle, decided to come visit me two weeks before her birthday, I knew I had my in! An excuse to bake (and eat!) cake for a great friend? Sold.

This is a beautifully *cringe* moist cake, thanks to the pineapple chunks and fresh carrot. So moist, in fact, that despite our aversion to that word, my friend who helped me bake this cake and I used it several times over to describe it. Yikes. Someone help us!

The frosting is a huge selling point – Joy goes into great detail about how to make a successful cream cheese icing. Mine turned out as well as can be expected considering I was finishing it up in the half-hour I had before having to meet Isabelle at the train! I was late! I had a mighty good excuse though.

We enjoyed huge slices of the cake on pretty colored plates, then went about our days. Only problem? I have over half of this cake going stale in my fridge. Who wants to help me find it a good home!?

This is the first in many Joy the Baker Cookbook creations that will be marching out of my kitchen in the coming months. I love her recipes, her voice, and her slang language. Did I mention that she and Shutterbean have a hilarious podcast? Put that in your ears! I’m a huge Joy fan, and I hope after this cake, you will be too.

You can find the recipe in her cookbook, or right here!

Delish! Enjoy.

The Book Learning Podcast: #4 + 5

Hey you! Have you been listening in? If not, you’ve been missing out!

Since I last posted about podcasting, we’ve recorded 2 more episodes. Episode 4 is described and linked in great detail on Gabrielle’s blog, so head over there to learn more/download it/put it in your ears.

Episode 5 is crazy cray cray. We’re beginning to talk about the steps of the editing process. Put it this way: according to Gabrielle, there are 7 steps in editing a novel, and we only covered two of them in this podcast! I’m way in over my head and feel like running away at full speed, but luckily my podcast partner is an old pro with editing and can walk me through it (relatively) calmly. It makes me nervous just writing about it!

If you, too, need a little guidance when it comes to editing your work, I encourage you to tune in to this series. You can watch the video above, or download (and subscribe) to the audio podcast on iTunes here.

Confused by all this podcast talk? If you’re new to The Book Learning Podcast, I have a FAQ written up here.

8/10: Washi-Wrapped Bottle

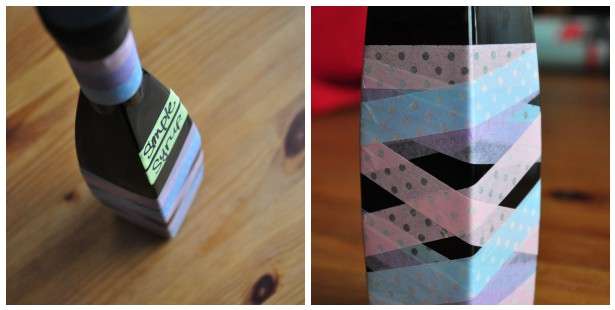
A fun, simple project that was totally in the spirit of DIY. It came about organically: right when I was about to toss out this old bottle, I realized it was pretty, and could be wrapped with tape or yarn or something and still be usable. Bonus points when I realized it came with a special stopper that lets liquid through slowly. I slightly mangled said stopper trying to get it out, but it still works, hallelujah.

My biggest problem with this project was the extremely sticky label on the bottle. It was one of those labels where you can barely get a tiny corner off before it rips. Twas impossible! So what could I do? Well I could watch a lot of Youtube videos about removing sticky labels. And then I could just stick it into a big pot of boiling water and pray it didn’t explode. To this day, I have no idea whether that was a good idea. Someone tell me please?

But, whatever, it worked! After a couple rounds in a pot of boiling water spiked with baking soda, the label just scrubbed right off. There was still a very small amount of sticky residue, but for the project I was doing it didn’t matter much.

The next step (after thoroughly washing and drying) was to get crafty! I pulled out my washi tape (a Japanese crafting tape, available at any craft store) and decided on pink, purple and blue. I only have 4 rolls, so the decision wasn’t that difficult!

Then it was just a matter of wrapping. I was hoping to wrap it up completely, so that there would be no bottle visible below the tape, but that plan fell apart when I began to wrap. The bottle has these beautiful contours that want to bend the tape on angles when you wrap it, and who am I to argue with a bottle? So I just did what the bottle told me to do, trying to keep the tape straight and not catch any air bubbles. When I got to the “halfway point”, the angles levelled out and I wrapped my way back down. I did this with all three colours, starting at different points on the base. Basically, I just had fun with it! The result:

 I love how graphic it turned out, and how the tape looks layered over itself. Some sections I went over twice with tape, others I left more translucent. I also wrapped three stripes around the neck of the bottle.

Finally, I went into the kitchen, boiled together a 1/2 cup of sugar and a 1/2 cup of water until the sugar dissolved, then poured it into my bottle. I labelled it (with washi tape, of course!) and now it sits on my counter proudly! I love how it looks, and when I run out of simple syrup (because of making a few too many cocktails) then I’ll just remove the label and use it as a vase.

This project was also fun, because now it’s gotten me on the lookout for quirky bottles to save and maybe reuse for projects like this one. Easy peasy!

And that makes 8 completed DIY projects in 2012! See the rest of them here.

Project 365: Week 27

It isn’t a secret that I love Joy the Baker and Tracy Shutterbean like it ain’t no thang. So colour me thrilled to see that finally, *finally*, my local bookstore had two copies of the JTB cookbook in stock. Let’s just say, now they only have one copy in stock. The recipes all look incredible, but I’ve only made one so far: the Single Girl Melty Chocolate Cake. My oven didn’t cooperate so I ended up overbaking it, but it was straight up delicious. I cannot wait to make every single other recipe.

This week has been lovely. Full of runs, DIY, cooking and baking, friends, happy hours, picnics, journalling, reading. I’ve had a great time. We’re past midsummer, so I’m trying to make the most of every day we have left in summer! Hope you have an awesome summery weekend.

Scroll to Top