Recipes

Jam Thumbprint Cookies

title2

I’m still eating vegan and still going strong! It’s been nice to get so much support from friends & family, but it’s also been (truly) not that big of a deal. Which is awesome! It’s a good feeling.

DSC_0001

I’ve also really enjoyed making vegan versions of things, including those yummy peanut butter balls. Funnily enough, Angela of Oh She Glows made her own recipe for those that looks a whole lot healthier than mine but seems just as tasty! I wish she’d posted it just a week earlier…oh well, at the rate they’re disappearing in my house, I’ll probably have to make another batch soon enough, and maybe I’ll give her recipe a try.

DSC_0012

In the meantime, I tried my hand at another old classic, the jam thumbprint cookie. I found the recipe on Keepin’ It Kind, a vegan website that actually hosts a virtual Christmas cookie swap every year! How cool is that? These are raspberry almond thumbprint cookies by Ketty of Luminous Vegans.

These cookies taste different than the non-vegan version, but since I haven’t had a regular jam thumbprint in a very long time, I can’t tell you exactly how they differ (helpfulness is my specialty, obviously). These are chewier, and taste deliciously of almonds, that much I know.

Ingredients

Makes 24 cookies

  • 4 tbsp of solid coconut oil (don’t melt it!)
  • 1/2 cup of sugar
  • 1 tsp vanilla extract
  • 1 tsp almond extract
  • 1 cup all-purpose flour
  • 1/2 tsp baking soda
  • 1/2 cup packed ground almonds (the original recipe doesn’t state if the ground almonds should be packed into the measuring cup, but I did and they turned out great. I ground my almonds whole and raw in the food processor.)
  • 2-3 tbsp almond milk (I found I needed a bit more almond milk than the recipe called for to hold the dough together)
  • ~2 tbsp jam of your choice (I used a summer fruit jam)

Set your oven to 350F. Mix together the oil, sugar and extracts until you get a consistency similar to creamed butter and sugar. In a separate bowl, mix your dry ingredients: flour, baking soda and ground almonds.

DSC_0114

Incorporate the dry ingredients into the sugar and oil mixture. It will probably not seem to come together very well, but after you add the almond milk it should form a dough that holds together when it’s squeezed. Knead the dough and shape it so it forms a ball.

Roll the dough into approximately 1 inch balls. Now for the fun part! Use your thumb to press indentations into the cookies. If they crack a little it’s okay, that’s part of their rustic charm don’t cha know.

DSC_0120

Bake for 6 minutes in the preheated oven. Then remove the cookies and use the back of a teaspoon to press the indentations in again, as they might have flattened out during baking. Then spoon about a 1/4 tsp of jam into each one. Bake for another 6-10 minutes (mine took around 10 more) until they are slightly browned around the edges. Sprinkle with powdered sugar!

DSC_0156

My house is slowly becoming dangerously full of delicious vegan treats. Yikes! Happily, they’re so tasty that even the non-vegans who live here are eating them too.

Peanut Butter Balls

pbbThe holiday baking is officially in full swing! These little guys have always been a favourite, but for my first vegan holiday season, they’re looking even better since they are so easy to veganize.

Our family always makes big trays of assorted holiday sweets, full of our favourite recipes that we’ve accumulated over the years. There are always peanut butter balls, butter tart squares, shortbread cookies, raspberry-coconut bars, “secrets” bars and decorated sugar cookies. This year I plan to make a few switcharoos to some of our favourite sweet treats to make them vegan-friendly, and hopefully nobody will be able to tell the difference!

DSC_0111

Ingredients:

Makes 24 balls

  • 1/3 cup smooth peanut butter
  • 3 tablespoons “buttery” spread (I used Becel’s Vegan margarine)
  • 1 1/2 cups icing sugar
  • 1 tablespoon non-dairy milk (I used plain almond milk)
  • 3-4 oz vegan chocolate (I used Enjoy Life chocolate)

Mix together the peanut butter, buttery spread, icing sugar and non-dairy milk. You’re looking for it to be fully incorporated with no lumps, in a consistency that holds together if you squeeze it.

DSC_0143

Form the mix into small balls, about a teaspoon each, rolling them between your palms. Place on wax paper on a cookie sheet and put them in the refrigerator to harden for at least an hour.

DSC_0145

Melt the chocolate in a bowl over a pot of simmering water or in the microwave. If you want the chocolate to be glossier, you can add about a teaspoon of vegetable shortening. I chose not to and am happy with my results.

pbb3

Roll the balls in the melted chocolate until fully coated. This works well with a fork. Shake off the excess a little and replace them on the cookie sheet. Let the chocolate harden, then enjoy!

pbb2

Stay tuned for more vegan adventures this holiday season. I’m already on the lookout for more sweet things I can make vegan-friendly!

Plum Cake

We interrupt this travel journal for a brief update.

I’m home! I’m back. I’ve been busying myself making podcasts, making myself healthier, making lists, making plum cake. I’m trying to be productive. I’m trying to make plans. I’m trying to get a job. I’m trying to breathe when I feel like I’m under an immense amount of pressure to “be successful” and decide “what to do with my life”. I’m missing my friends like crazy (we scattered across this fine country and beyond after graduation) and I’m trying to keep in touch with them.

I’m appreciating the beautiful fall weather. I’m loving all the delicious smells that come out of my family kitchen. I am grateful I don’t have to pack up my things every few days or have cold showers or share a room with seven other people. I am enjoying getting back into a bit of a rhythm in my days. I’m working on keeping my thoughts balanced and positive. I’m loving being around people who love me unconditionally, I’m happy to be having meaningful conversations. I’m happy.

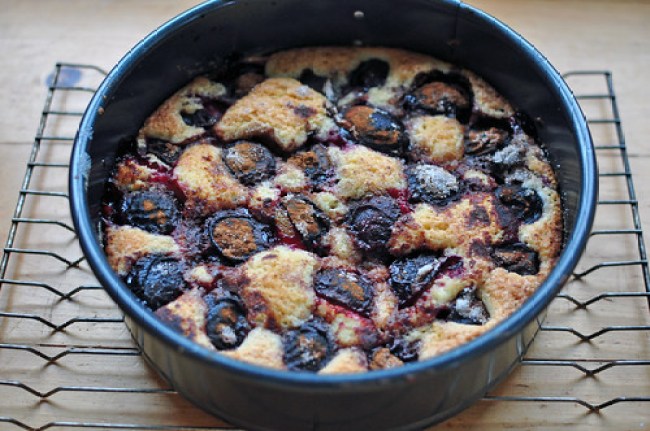
I made this cake because my mom bought a bunch of beautiful plums at the farmer’s market and they weren’t getting eaten. The same day she bought them, Deb from Smitten Kitchen posted a recipe for a Purple Plum Torte. Synchronicity! I’m aiming for more of that in my life.

The recipe couldn’t be simpler, or more satisfying. I followed her instructions exactly and it came out absolutely perfectly. She recommends not trying it until the second day, because apparently that way the flavours have a chance to mingle. I didn’t try it the first day, so I can’t really confirm. But the second day? Wow. It’s delicious. It’s such a simple recipe but couldn’t be tastier. There’s lots of yummy caramelized bits, the cake is moist, and the plums have so much flavour. Plus, it’s gorgeous, isn’t it? It’s so beautifully rustic.

I love almost every recipe Deb posts (um, this margherita pizza??), and would love to get my paws on a copy of her beautiful cookbook. Someday. For now, I’ll keep making the wonderful recipes from her blog.

Happy eating, everyone!

Buddha Bowls

DSC_0082

This isn’t really a recipe, but then, this isn’t really a normal week. Girl’s got mountains of work, which only means…uncontrollable urges to create things, apparently.

I’m trying to eat healthier these days (which reminds me, I’m plum out of spinach, must remedy!) and I’ve been enjoying trying to challenge myself to incorporate more veggies into my meals. I had a pleasant surprise when I realized I could just pack a big salad for work or for lunch and by pack I mean throw together and by salad I mean a handful of spinach + assorted veggies that are lying around + nuts + salad dressings = badda bing badda boom, a meal (!?!). That was a revelation! An epiphany! For a couple weeks now, I’ve chopped up and roasted a broccoli with an absurd number of garlic cloves, and then forcibly prevented myself from eating all of it in one sitting (which I would quite happily do), and I’ve loved having broccoli just hanging out in my fridge waiting for its purpose in life aka my salad or buddha bowl.

Untitled
Do you guys know what a buddha bowl is? I didn’t, but I liked the name and googled it and lo and behold, that’s what this is. Kris Carr, Vegan Goddess, says that buddha bowls are veggies, a grain, and dressing – check out her recipe here. I started making these because I was inspired by eating bibimbap at a quaint Korean place and wanted to replicate it at home. Some other sources of inspiration: this homemade bibimbap, this sushi salad, and this sushi salad.

Like I said, this isn’t really a recipe. It’s a lifestyle.

..haha just kidding. But it’s pretty straightforward. Here’s what I usually do:

Make some sushi rice. I follow the directions on the package, then season with salt, a little sugar or sweetener, and rice vinegar to taste.

While you’re waiting for the water to boil and the rice to cook, busy yourself chopping veggies/roasting veggies/pan-frying veggies/assembling other ingredients. Some of my fave toppings:

  • Roasted broccoli: chop broccoli into small little trees. Lightly coat with oil, salt and pepper, and mix in a few crushed cloves of garlic. Roast at 400 for about 20-30 minutes or until you get the desired bite you want.
  • Roasted sweet potatoes: chop into small cubes. Coat with oil, salt and granulated garlic. Roast at 425 for 20 minutes, turning part way through if ya want to (works even if you don’t, but one side might be slightly darker)
  • Fresh or pickled cucumber
  • Lightly sauteed spinach, mushrooms, carrots, onions
  • Edamame: buy frozen, you can reheat/cook in the microwave!
  • Nori sheets, cut up (easiest to cut with scissors instead of a knife, thanks Shutterbean for the tip)
  • AVOCADO obviously!
  • Panko bread crumbs sprinkled over top
  • Gochujang, a spicy red chile Korean condiment
  • Drizzle of soy sauce
  • Put an egg on it! (fried)

DSC_0005

Pile all your favourite ingredients into a bowl, layering the rice, then veggies and condiments, then the egg. I like to eat my buddha bowls the way I eat bibimbap: stir everything around all in a mush so that the egg yolk gets everywhere and the veggies get all mixed up with the condiments.

I love love love these things because I can load so many odds and ends of my refrigerator into one meal and it’s filling and oh yeah did I mention it’s insanely delicious! Om nom.
DSC_0080

Ps. Can we collectively just get into this method for cooking fried eggs? I have tried it a few times now and it’s so crazy cool/effective!

Happy Tuesday everyone! Hope it’s pretty outside where you are and you nonchalantly sit on a curb with your best friend and don’t really think about it at the time but later realize “Spring Sprung! Happy day!” (true story).

Scroll to Top